

Aircast Cryo Cuff with Gravity Cooler
PayPal Pay Later
Starts From
Description
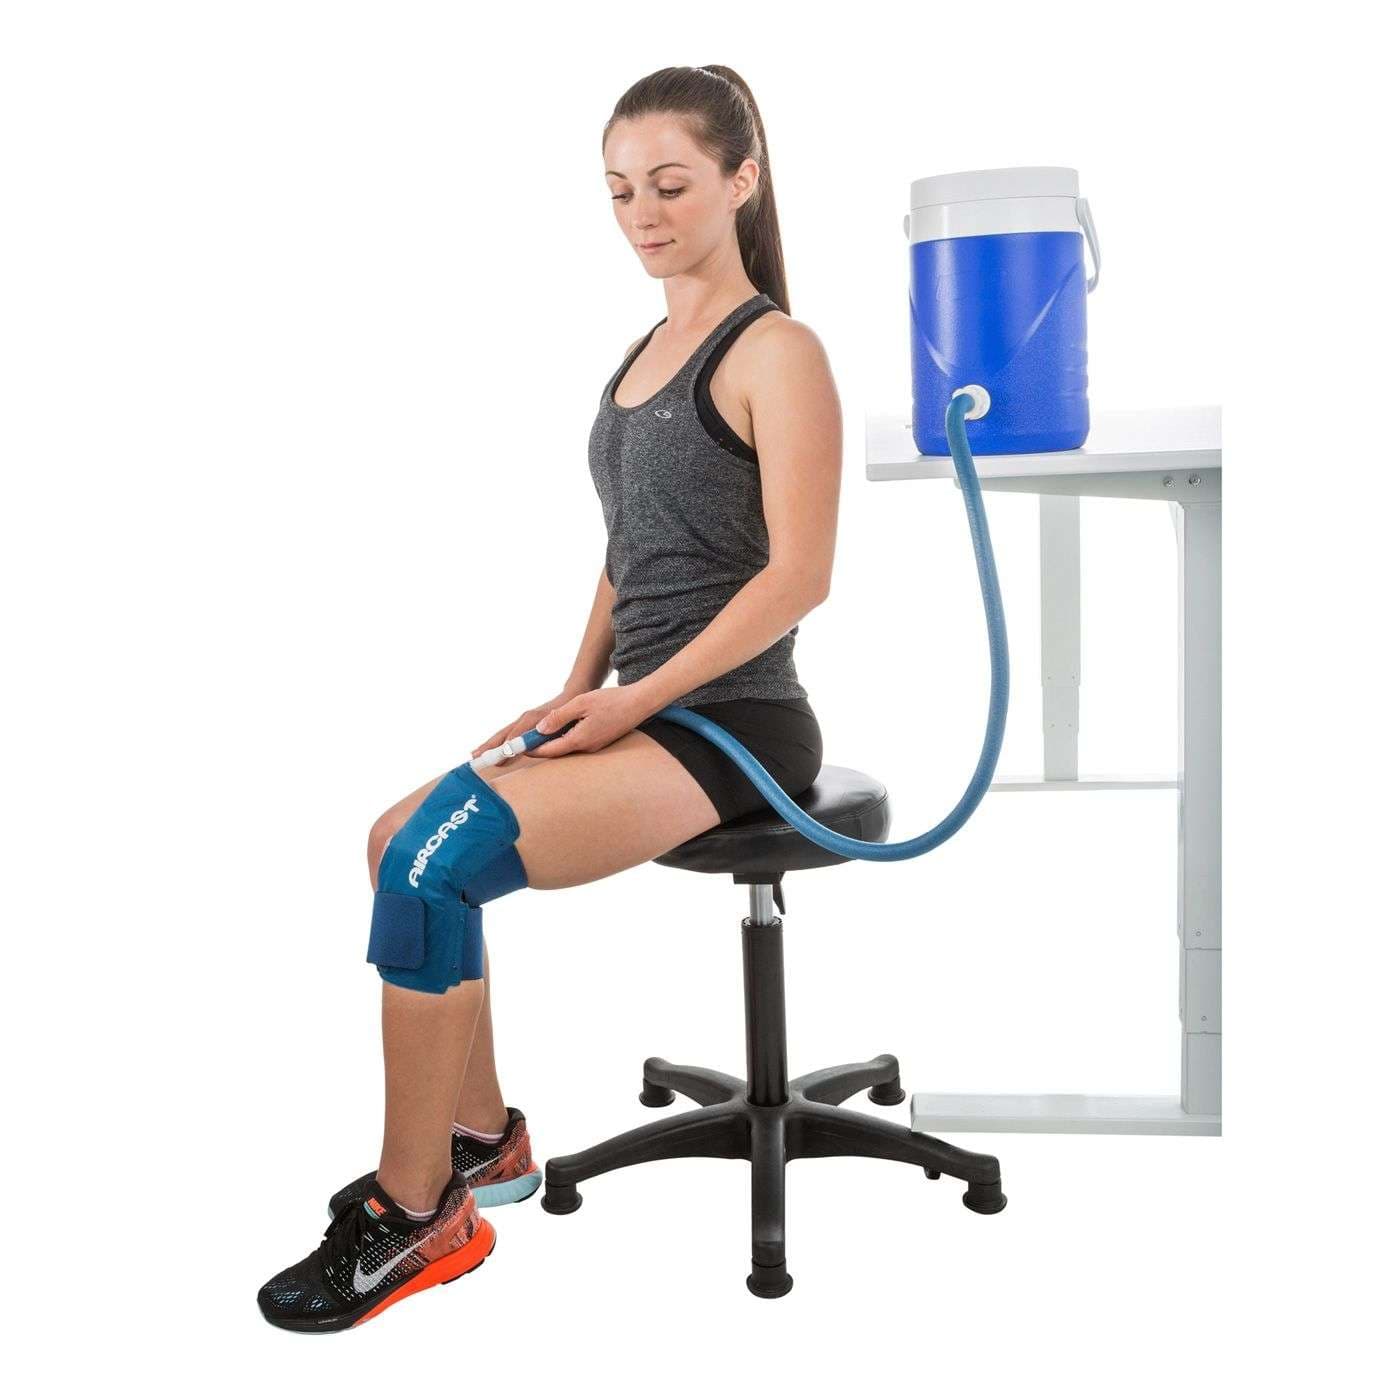
DJO Aircast Cryo/Cuff with Gravity Cooler combines cold therapy with targeted compression, providing a clinically proven approach to aid in post-operative recovery, trauma care, athletic training, and home use. The Cryo/Cuff Gravity Cooler delivers chilled water to anatomically specific cuffs, ensuring focused relief to the afflicted area. Its simple, gravity-fed system is designed for both safety and ease of use, making it an ideal choice for various recovery needs. Whether you need it for your foot, ankle, knee, shoulder, or back, this cooler is compatible with all Cryo/Cuff and Arctic Flow pads, ensuring versatile application across different body parts.
Ideal for: Post-operative recovery, trauma, athletic training rooms, and home use
Features
- Integrated Cold Therapy and Compression: Combines the benefits of cryotherapy and focal compression for effective recovery.
- Ideal for Various Applications: Suitable for post-operative recovery, trauma, athletic training rooms, and home use.
- Simple Gravity-Fed System: Ensures ease of use and consistent performance.
- Anatomically Specific Cuffs: Available for foot, ankle, knee, shoulder, and back to target specific areas.
- Compatibility: Works with all Cryo/Cuff and Arctic Flow pads.
- Includes Accessories: Comes with a tube assembly and insulation disk for optimal functionality.
WARNING: This device can be cold enough to cause serious injury. Read and understand all warnings and instructions for use before utilizing this device. Additional warnings are provided in the instructions for use.


How is the Cryo/Cuff Gravity used?
STEP 1 - Prepare the cooler (Figure 1)
- Connect the blue tube to the cooler.
- Add cold water to the line indicated inside the cooler.
- Fill with ice to the line inside the cooler.
- Lay the insulation disk on top of the ice. Attach the cooler lid snugly.
- Allow five minutes with occasional shaking to chill the water.
STEP 2 - Apply EMPTY Ankle Cryo/Cuff (Figure 2)
- Use only Aircast Cryo/Cuffs or Arctic Flow Cuffs with Aircast Cryo/Cuff Gravity.
- Carefully and completely read the instructions supplied with the specific Cryo/Cuff before application. Please follow the instructions below to continue cooler preparation.
STEP 3 - Fill and pressurize Cryo/Cuff (Figure 3)
- Connect the blue tube to the Cryo/Cuff.
- Open the cooler air vent.
- Raise the cooler above the Cryo/Cuff until the cuff is full – NOTE: To avoid excessive pressure during use, do not raise the cooler higher than 15” (38 cm) above the Cryo/Cuff.

- Close the cooler air vent.
- The cooler can be disconnected by pressing the quick-disconnect.
Re-fill cooler:
- Rechill Cryo/Cuff as needed.
- IMPORTANT: Empty the Cryo/Cuff completely while still attached to the cooler.
- When the Cryo/Cuff is empty, then empty the cooler. Repeat steps 1-5 in Step 1 to prepare the cooler for refilling.
To clean cooler:
- The cooler can be cleaned with disinfectant wipes.
- The tube assembly can be cleaned with common mild detergent and must be completely submerged and hand-dried.
To troubleshoot:
- Make sure the unit has ice and water filled to the line indicated inside the cooler.
- Make sure to fill the cooler and Cryo/Cuff as instructions indicate.
- Check the Cryo/Cuff connection; make sure to listen for a click when connecting the hose to the Cryo/Cuff.
- Make sure the Cryo/Cuff is empty before refilling.
CAUTION:
- Do not use an elastic wrap with the Cryo/Cuff Gravity.
- The dressing used under the Cryo/Cuff should be applied lightly.
- Reduce pressure with any sense of discomfort, numbness, or tingling of the limb.
- EMPTY the Cryo/Cuff after each use, and before refilling.
- Patient skin condition checks must occur every 1-2 hours on a routine basis.
Specifications
| Manufacturer | Aircast |
|---|---|
| Application | Cold Therapy System |
| Securing Method | Hook and Loop Closure |
| Usage | Reusable |
| UNSPSC Code | 42142120 |
Warranty
- The product warranty is applicable as per the terms and conditions provided by the product manufacturer.
Please call us for specific details.
Return
- No returns will be accepted after 30 days from the date of shipment.
- All returns are subject to a restocking fee as per manufacturers terms and conditions.
- All returns must have an RGA number (Returned Goods Authorization), unauthorized returns will not be accepted.
- We do not guarantee fulfillment of any desired purpose or product suitability to the user and this will not be considered as a valid reason for return.
- The products must be new, unused condition, not tampered with, in original packaging and returned at the customers expense in the original packaging.
- If your return is not due to any manufacturing defect then the original shipping cost will be deducted from the total refund.
- Hygiene, bath and toilet items cannot be returned once opened or used.
- Standard manufacturer terms and conditions apply for return policy of this product.
Please call us for specific details.
Description
DJO Aircast Cryo/Cuff with Gravity Cooler combines cold therapy with targeted compression, providing a clinically proven approach to aid in post-operative recovery, trauma care, athletic training, and home use. The Cryo/Cuff Gravity Cooler delivers chilled water to anatomically specific cuffs, ensuring focused relief to the afflicted area. Its simple, gravity-fed system is designed for both safety and ease of use, making it an ideal choice for various recovery needs. Whether you need it for your foot, ankle, knee, shoulder, or back, this cooler is compatible with all Cryo/Cuff and Arctic Flow pads, ensuring versatile application across different body parts.
Ideal for: Post-operative recovery, trauma, athletic training rooms, and home use
Features
- Integrated Cold Therapy and Compression: Combines the benefits of cryotherapy and focal compression for effective recovery.
- Ideal for Various Applications: Suitable for post-operative recovery, trauma, athletic training rooms, and home use.
- Simple Gravity-Fed System: Ensures ease of use and consistent performance.
- Anatomically Specific Cuffs: Available for foot, ankle, knee, shoulder, and back to target specific areas.
- Compatibility: Works with all Cryo/Cuff and Arctic Flow pads.
- Includes Accessories: Comes with a tube assembly and insulation disk for optimal functionality.
WARNING: This device can be cold enough to cause serious injury. Read and understand all warnings and instructions for use before utilizing this device. Additional warnings are provided in the instructions for use.


How is the Cryo/Cuff Gravity used?
STEP 1 - Prepare the cooler (Figure 1)
- Connect the blue tube to the cooler.
- Add cold water to the line indicated inside the cooler.
- Fill with ice to the line inside the cooler.
- Lay the insulation disk on top of the ice. Attach the cooler lid snugly.
- Allow five minutes with occasional shaking to chill the water.
STEP 2 - Apply EMPTY Ankle Cryo/Cuff (Figure 2)
- Use only Aircast Cryo/Cuffs or Arctic Flow Cuffs with Aircast Cryo/Cuff Gravity.
- Carefully and completely read the instructions supplied with the specific Cryo/Cuff before application. Please follow the instructions below to continue cooler preparation.
STEP 3 - Fill and pressurize Cryo/Cuff (Figure 3)
- Connect the blue tube to the Cryo/Cuff.
- Open the cooler air vent.
- Raise the cooler above the Cryo/Cuff until the cuff is full – NOTE: To avoid excessive pressure during use, do not raise the cooler higher than 15” (38 cm) above the Cryo/Cuff.

- Close the cooler air vent.
- The cooler can be disconnected by pressing the quick-disconnect.
Re-fill cooler:
- Rechill Cryo/Cuff as needed.
- IMPORTANT: Empty the Cryo/Cuff completely while still attached to the cooler.
- When the Cryo/Cuff is empty, then empty the cooler. Repeat steps 1-5 in Step 1 to prepare the cooler for refilling.
To clean cooler:
- The cooler can be cleaned with disinfectant wipes.
- The tube assembly can be cleaned with common mild detergent and must be completely submerged and hand-dried.
To troubleshoot:
- Make sure the unit has ice and water filled to the line indicated inside the cooler.
- Make sure to fill the cooler and Cryo/Cuff as instructions indicate.
- Check the Cryo/Cuff connection; make sure to listen for a click when connecting the hose to the Cryo/Cuff.
- Make sure the Cryo/Cuff is empty before refilling.
CAUTION:
- Do not use an elastic wrap with the Cryo/Cuff Gravity.
- The dressing used under the Cryo/Cuff should be applied lightly.
- Reduce pressure with any sense of discomfort, numbness, or tingling of the limb.
- EMPTY the Cryo/Cuff after each use, and before refilling.
- Patient skin condition checks must occur every 1-2 hours on a routine basis.
Specifications
| Manufacturer | Aircast |
|---|---|
| Application | Cold Therapy System |
| Securing Method | Hook and Loop Closure |
| Usage | Reusable |
| UNSPSC Code | 42142120 |
Warranty
- The product warranty is applicable as per the terms and conditions provided by the product manufacturer.
Please call us for specific details.
Return
- No returns will be accepted after 30 days from the date of shipment.
- All returns are subject to a restocking fee as per manufacturers terms and conditions.
- All returns must have an RGA number (Returned Goods Authorization), unauthorized returns will not be accepted.
- We do not guarantee fulfillment of any desired purpose or product suitability to the user and this will not be considered as a valid reason for return.
- The products must be new, unused condition, not tampered with, in original packaging and returned at the customers expense in the original packaging.
- If your return is not due to any manufacturing defect then the original shipping cost will be deducted from the total refund.
- Hygiene, bath and toilet items cannot be returned once opened or used.
- Standard manufacturer terms and conditions apply for return policy of this product.
Please call us for specific details.
Starts From


